Learning Vue for Angular developers should be an easy task to master. Due to its fast learning curve but also due to the basis of Angular knowledge which is more than enough to become proficient in Vue.
In our front-end development department, the first thing that I kept hearing about was Angular, a very complex framework made by Google and a pretty hard one to learn, to be honest.
The next big thing was React, a JavaScript library developed by Facebook which appeared to be a strong candidate in the fight for popularity.
And since 2014, we have Vue. It was made by a former Google employee and it is often described as a “love child” between the previous two: React and Angular.
Table of Contents
Large companies use Vue.js for their platforms, so why don’t you give it a shot? Here are some examples:

So What Is Vue.js?
Vue is a progressive lightweight framework for building user interfaces.
This means that it is implemented as an additional markup to HTML. To put it in more simple words, if the model is changing, then the HTML will change too.
It has the same benefits as Angular, which are interpolation, two-way data binding, directives, and many more.
It is easy to adopt and integrate with other libraries or existing projects. Vue is also perfectly capable of powering sophisticated Single-Page Applications.
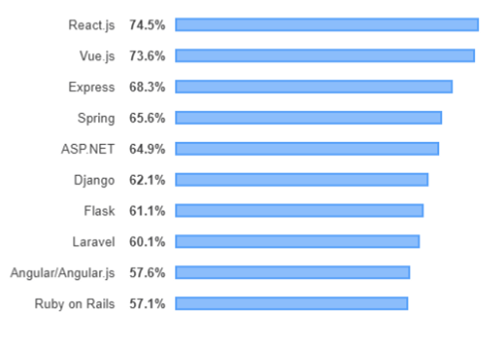
In the battle of Angular vs. Vue, in the job market, Angular is more in demand.
In the battle of Vue vs React, React takes the lead when it comes to searches, although both React and Vue are popular among experienced developers.
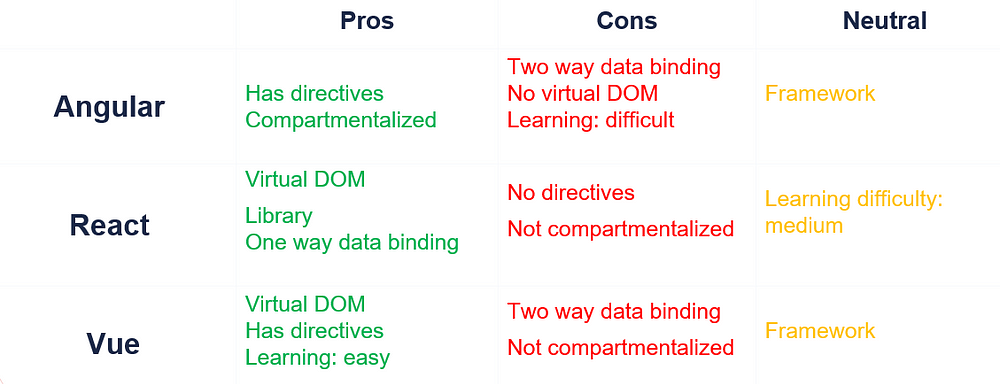
React + Angular = Vue
There are a few good reasons why a lot of people refer to Vue as the love child:
Prerequisites
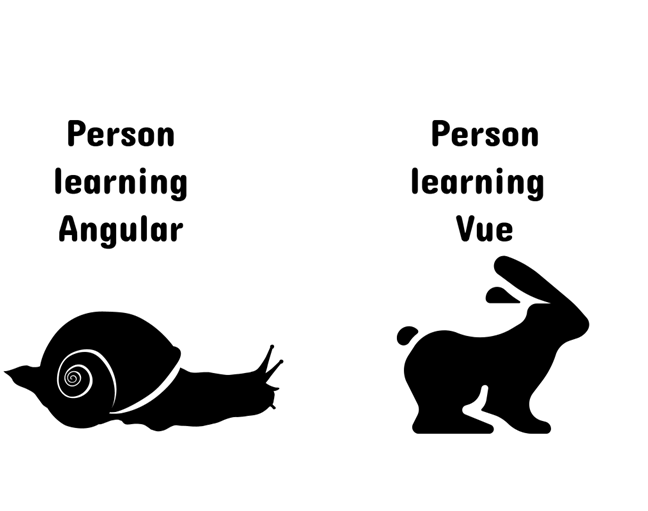
I will start by saying Vue is the best option for a junior front-end developer. Vue has the fastest learning curve of all three big technologies as it does not need a lot of prerequisites.
If you know how to use HTML, CSS, and have basic JavaScript frameworks knowledge, you are good to go to start learning Vue. Angular uses Typescript which is a superset of JavaScript and the learning curve is pretty steep.
You should know you have to invest a lot of time into learning Angular. For me, it took around 1–2 months, 6 hours/day to learn it in such a way I felt confident to do the work without too much supervision from senior colleagues. Still, there is a hidden advantage behind the time spent learning Angular.
In my opinion, if you know the Angular framework, you can easily master Vue. It took me less than a week to feel comfortable using Vue and I even used some advanced concepts.
Components
If you will look at the image below you will see a big human representing a Vue Instance will little child components next to him.
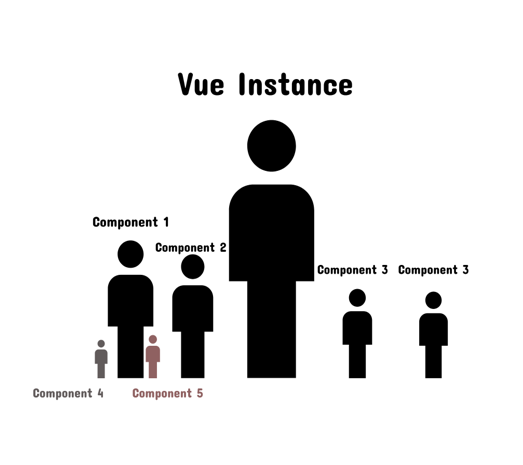
The analogy is quite simple: a Vue Instance resembles the app module from Angular. Usually, you will use only one module in your application and the same goes for Vue Instances.
Components are reusable parts of Vue and can be globally or locally registered. As you can see, Component 3 is displayed twice.
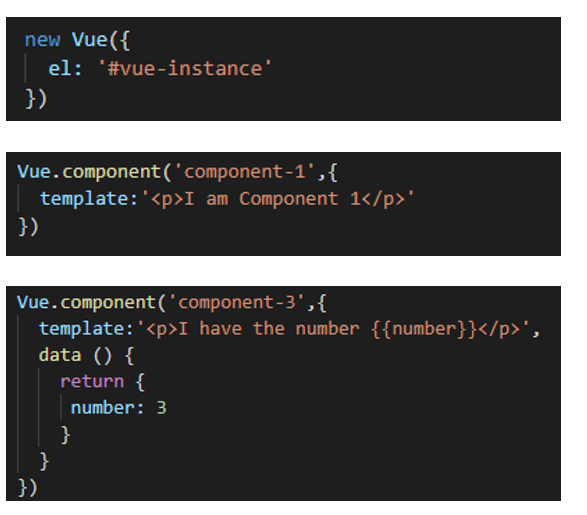
Vue instances specify the DOM element where the app will be rendered ( found in the “el property”). A Vue instance has multiple properties: name, data, methods, lifecycle etc.
- A name is required for referencing the component.
- The data is a function where you keep the variables of your component.
- The methods section contains all the functions needed to access/manipulate data. Other methods are for handling the lifecycle.
Components Registration
A component can be locally or globally registered.
In the previous image, we saw globally registered components.
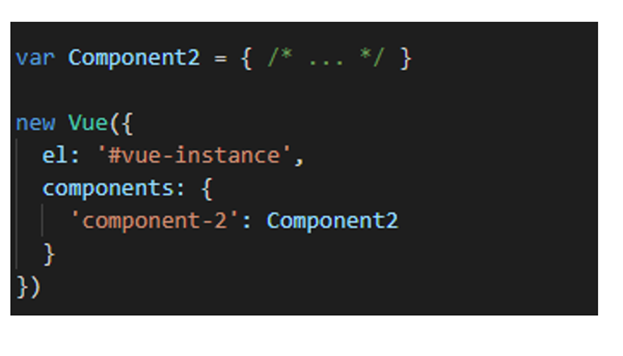
To have local registration, the syntax changes and you will have to import it and specify it in the components section of the parent like in the image.
Another example of local registration is using ES2015 syntax which we will use in the next section.
Passing Arguments
One property of a function is called props. Props represents the arguments that had been passed to the component.
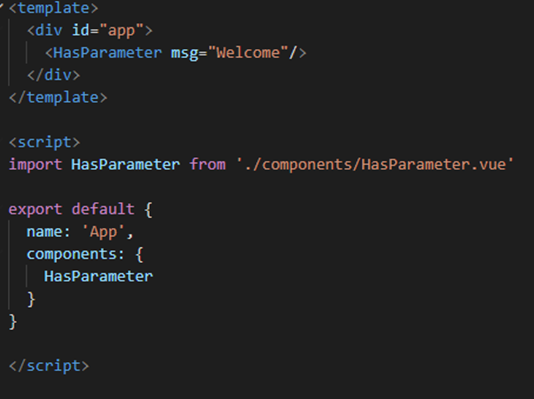
Note that objects and arrays in JavaScript are passed by reference, so if the prop is an array or object model, mutating the object or array itself inside the child component will affect the parent state.
In this case, the parent component (App component) is declared with ES2015 syntax and the child component is specified in the ‘components’ section.
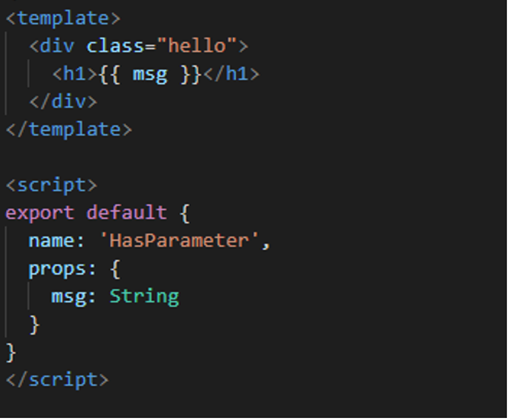
In the HTML of the parent, you will simply specify the name of the parameter (msg in this case) and its value (“Welcome”).
In the child component, you have the ‘props’ section with the argument’s type and name.
In the end, the screen will display “Welcome ”.
More details will be discussed in the Directives section.

Child Components Events
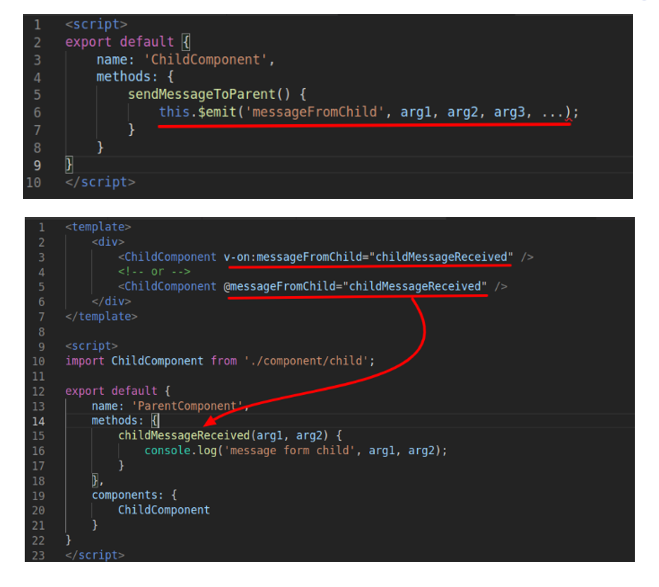
In your application development process, you might find it necessary to communicate from a child component to the parent component.
This is possible in Vue.js by emitting an event from the child component to the handler of the event in the parent component.
@ is a shorthand for v-on: and we will discuss about it more in the Conditionals, Loops, and Events chapter.
Lifecycle Methods
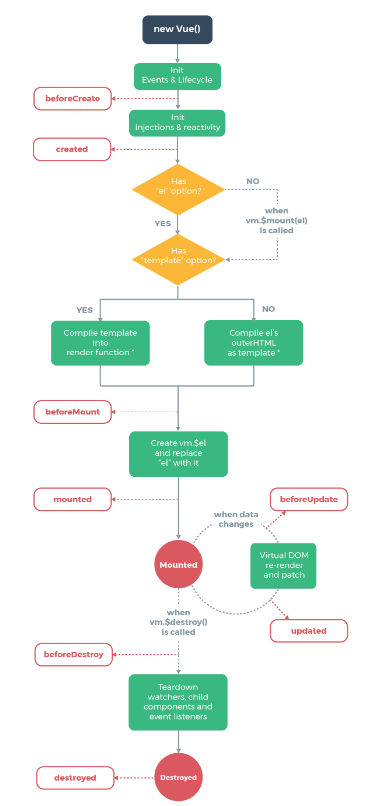
As an Angular developer, I guess you have used a lot of times OnInit, OnDestroy, OnChange and many more, but how do we use the lifecycle methods in Vue?
The first method we will talk about is beforeCreate which will be called before rendering so be aware that the DOM elements, events and data are not accessible in this part.
The close equivalent is the first call of OnChanges which happens before OnInit.
Next, we will see some examples of these methods and I hope you would understand better what data you can access and which you can’t.
So let’s start with the first example!
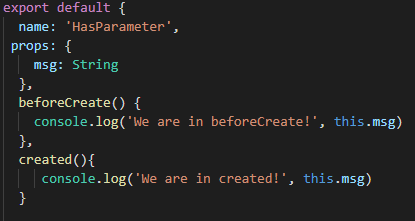
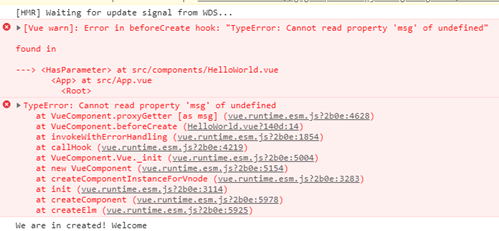
Here, you can see we want to access the msg prop but this will throw an error because the data is not yet accessible.
The created method can access the data and events, but DOM elements are still not available.
The close equivalent of created in Angular is OnInit.
The next method that gets called is beforeMount, where all the template or render functions have been compiled but we still can not access the DOM elements.
The close equivalent in Angular is AfterContentInit. We do not have an equivalent for AfterContentChecked.

The next method that gets called is mounted, where we can finally access the DOM elements.
The equivalent in Angular for this method is AfterViewInit.
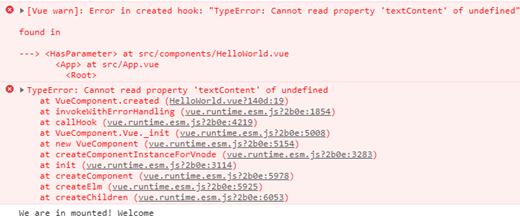
This method is the most often used lifecycle hook in Vue.
When an update occurs in the application the beforeUpdate() method gets called. Here we can access the updated data before the DOM is re-rendered.
The update method is called only after the changes have been made to the DOM. In Angular, you can access the previous value and the current value after the update has been done with OnChanges.
We finally reached the last 2 methods which are used to clean up your component.
In the beforeDestroy() method we will unsubscribe or detach events. The equivalent is OnDestroy. In the destroyed() method nothing will be left of your component and we do not have an equivalent for this in Angular
Styling

Styling can be put in the style tag or inline. If you choose to have an inline style you can use v-bind when you need to access the variables from your script tag.
You can specify that the style of a Vue component can be applied only to that component by mentioning “scoped” in the open tag.
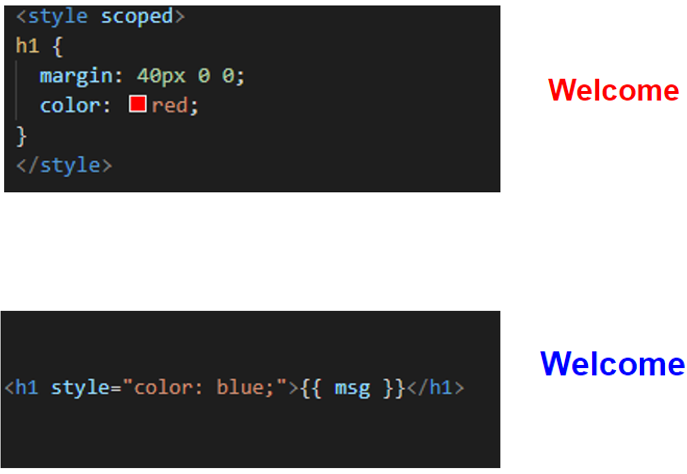
If we do not have an inline style, the colour of the text will be red, but if we add the inline, the colour will be blue even if in the style section we specified it to be red.
Requests
The purpose of requests is to establish communication between the front-end and back-end in order to retrieve and manage data. Requests can be made in Vue with the help of Axios, which you can get by writing in the CLI “npm install — save axios”.
Axios is not the only way with whom you can make requests. An alternative, for example, is express.
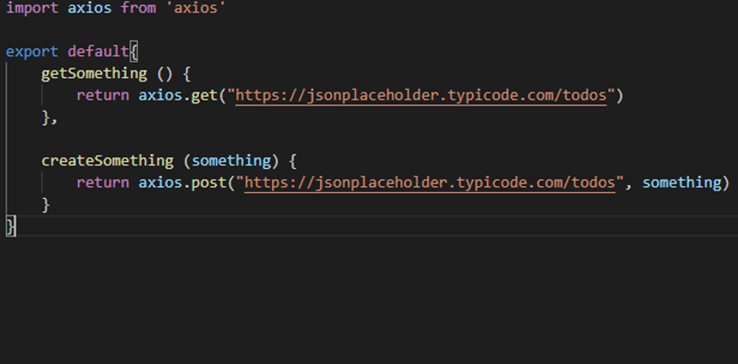
Create a new folder in your app called services and inside it make a JavaScript file called however you want, but make sure the name is relevant to its behaviour.
First, you need to import Axios and create a component with the wanted requests.
In my example, I have a get and a post request which are treated as promises.
You just specify the type of the request, the URL and if needed, parameters.
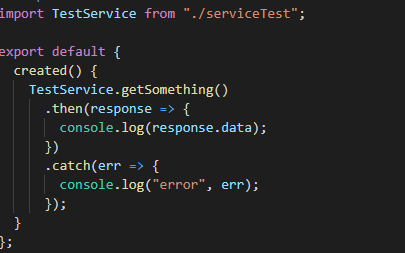
In the component where you need to call those requests, import the JavaScript file you just created.
The request is a promise where you will find the data from the back end by accessing “result.data”.
You do not need to call json() method like in React.
Directives
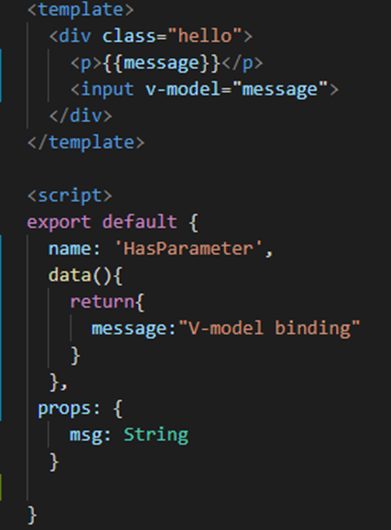
The directives in Vue are similar to the ones in Angular.
You replace *ngIf with v-if, *ngFor with v-for, ngModel with v-model, and so on.
In this example, we will see a paragraph which will contain the value of the input, the variable used is “message”.

Conditionals, Loops, and Events
V-if: checks if an element will be rendered based on a Boolean expression.
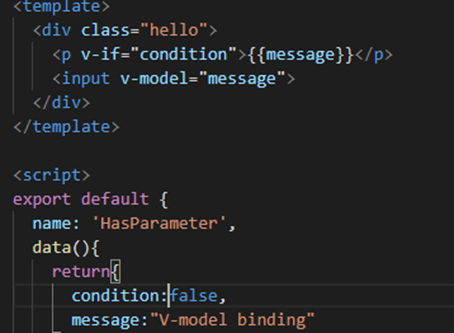
V-else: renders another element if v-if fails.
V-else-if: similar to the case when using nested statements.
V-for: iterates over a list.
V-on: listens to events in the DOM, like click, submit, keyup etc.
Bindings
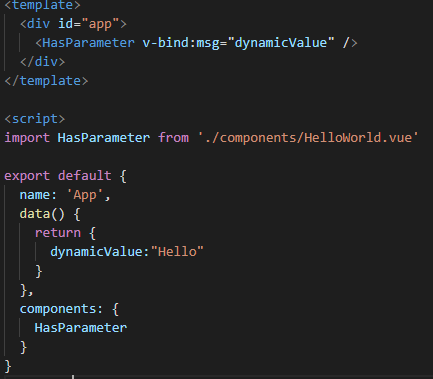
V-bind: dynamically binds one or more attributes or a component prop to an expression.
V-bind is also required if you need to pass a number because if you do not specify its type, it will be treated as a string.
In order to pass an argument dynamically to a component, you need to use it with v-bind.
Some Goodies
Now that you know all the basic concepts you need for creating a Vue application, we can already dive into more complex parts like Vuex.
Hurray, you’ve made it till here!
Vuex

Vuex is a state management library and pattern for Vue.js applications.
It serves as a centralized store for all the components in an application, with rules ensuring that the state can only be mutated in a predictable fashion.
It also integrates with Vue’s official DevTools extension to provide advanced features such as zero-configuration time-travel debugging and state snapshot export/import.
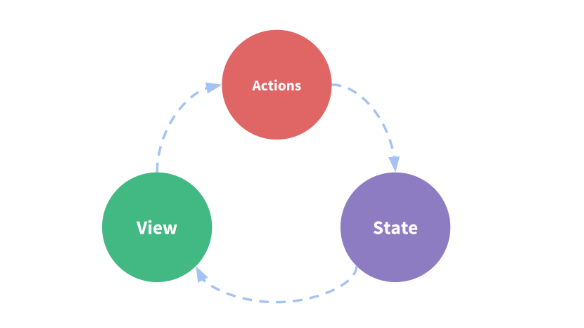
So what is this state management pattern?
To put it into more simple words, you try to section your application like this:
State is the data that is being manipulated and to whom are the actions applied.
View is responsible for displaying the data found in the state.
Actions are operation made to the state.
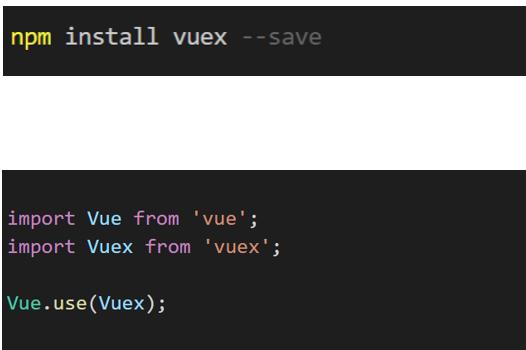
Before we start learning how to use Vuex we first need to install it by opening your console and writing npm install vuex –save.
After that, you explicitly need to import Vuex from Vuex.
Also, you have to tell Vue to use Vuex.
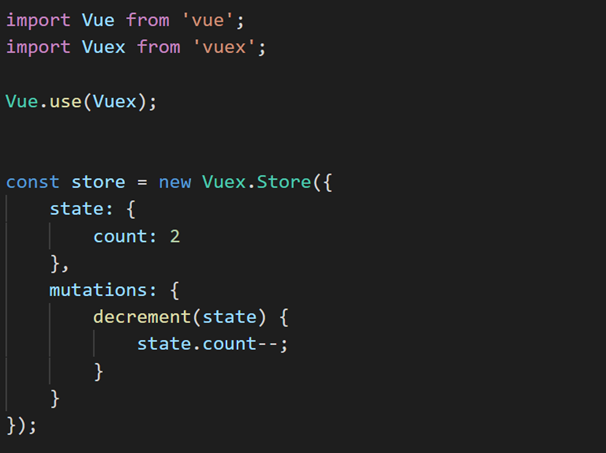
In the next example, we have defined the store with the state as a count initialized with the value of 2. In the mutation section, we have defined the actions that would be applied to the state, in this case, the decrement of count with one.
In a component, we have called and displayed the result of the action. Usually, the view layer is represented in the HTML, but for the simplicity of the example, I have chosen the console.

I hope now you are no longer overwhelmed by the term state management pattern and you understand what it is and how to implement it in your Vue application with the help of Vuex.

All Ready for Vue?
Although this guide is lengthy, I wanted to include all the information in one place, so it would be easier for you to learn Vue.
If you’re looking to expand your technology stack, you can also check my other guide of getting started with React.
As always, here there are some further materials to help you learn Vue:
Did you recently learn Vue.js? How was your learning experience, compared to learning other programming languages?
I would love to hear your thoughts in the comments!




2 comments
You have demystified Vue. I feel better about looking it up now and developing a single-page app with it. Thanks a lot!
Glad to hear!
Comments are closed.